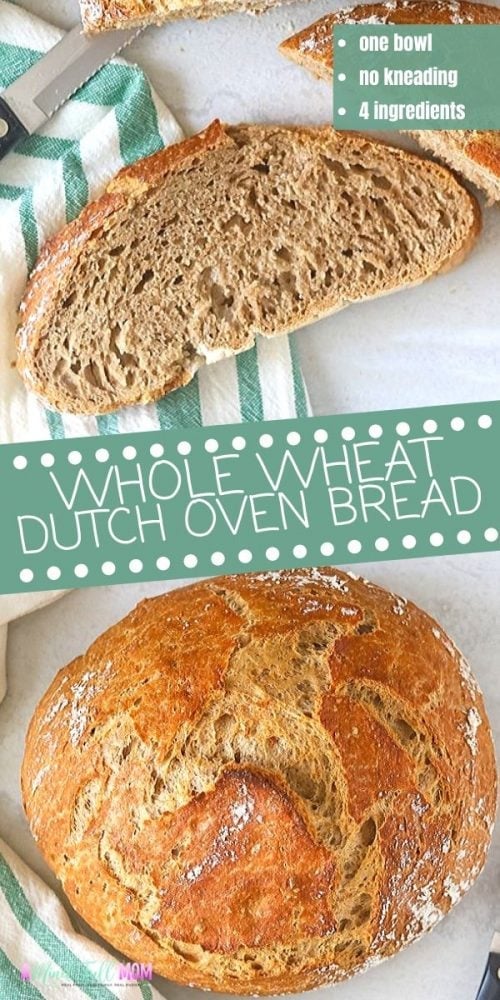
This is the EASIEST method for making Whole Wheat Bread! This recipe for No-Knead bread is made without special equipment, only a few minutes of prep and produces the most delicious hearty, rustic bread.
Not only is this Dutch Oven Bread incredibly easy to make, but it is also one of my favorite bread recipes. It toasts up perfectly but is divine when served with a smear of butter next to homemade Potato Corn Chowder or Lasagna Soup.

I am a bit of a bread snob. I want hearty, rich, and crusty bread that is full of flavor and texture and worthy of every calorie consumed.
And friends, this No-Knead Dutch Oven bread not only meets my high standards for bread, but it is also the EASIEST bread recipe to make.
- One Bowl
- 4 Ingredients
- No-Kneading!!
This no-knead dutch oven bread is just perfection!!
Crusty on the outside and tender on the inside. It reminds me of a fresh loaf of bread that I would pick up from an expensive bakery. Instead, it is something I made with a few simple staples and hardly any effort at all--FOR PENNIES!
How to Make No-Knead Dutch Oven Bread
- In a large mixing bowl, mix together the flour, yeast, salt, and water until just combined.
- Cover the bowl with plastic wrap or a kitchen towel and set on the counter to rest overnight.

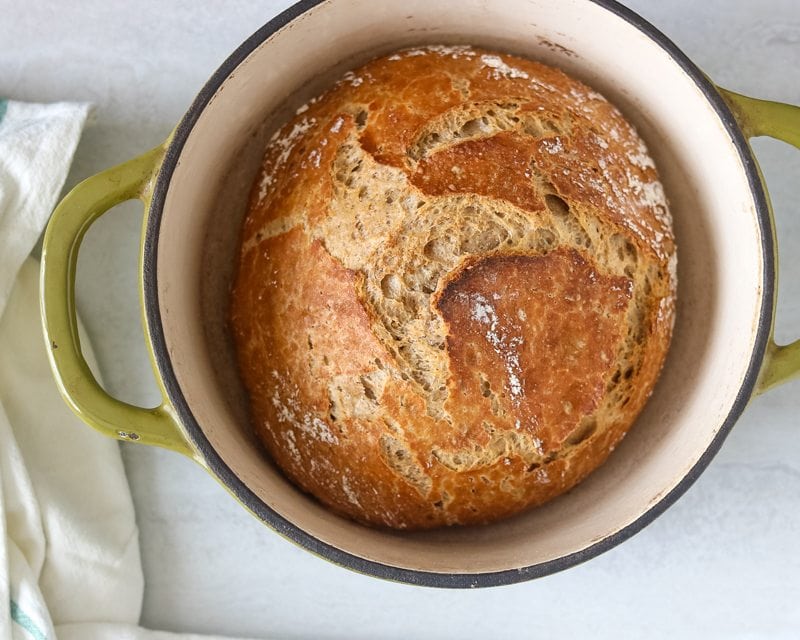
- After the dough has risen, place the dutch oven in the oven and turn the oven to 450 degrees. You must preheat your dutch oven for this bread to turn out perfectly.
- Dump onto a floured cutting board and shape into a circle.

- Carefully remove dutch oven from oven and then place the rounded dough into the pan. Cover and bake for 30 minutes.
- Remove cover and bake for an additional for 20 minutes.
- Let cool and enjoy!

Important Notes on this Recipe
- You will know your bread is done cooking when it reaches a temperature on an instant-read thermometer of 207-209 degrees.
- I use whole wheat flour for this recipe, but you can use half whole wheat and half all-purpose or whole white wheat flour as well.
- Be sure to use a spoon/scoop to add flour to your measuring cup--if you just scoop from canister using the measuring cup, you will end up with significantly more flour than this recipe calls for.
- Use regular active dry yeast, not rapid rise or instant yeast.
- Do NOT forget the step to preheat your dutch oven in the oven while the oven preheats, that is crucial to achieving the right texture.
More Bread Recipes
- Easy Whole Wheat Cranberry Walnut Bread
- Whole Wheat Cinnamon Raisin Bread
- Homemade Italian Bread
- Honey Whole Wheat Bread
This is a great starter recipe for homemade bread. It is simple, easy, and delicious! I hope you give a try and enjoy!

No-Knead Whole Wheat Dutch Oven Bread
Ingredients
- 2 cups warm water between 100-115 degrees Fahrenheit
- 2 teaspoons salt
- 1 teaspoon dry active yeast
- 3 ¾ cups whole wheat flour or 480 grams
Instructions
- In a large mixing bowl, combine the flour, yeast, and salt. Slowly mix in the water using a wooden spoon or spatula.
- Cover the mixing bowl with plastic wrap or a clean kitchen towel, and let sit out overnight at room temperature--or for at least 8 hours.
- After the dough has risen, turn out the dough onto a lightly floured surface and with floured hand, shape it into a circle. Let the dough rest while the oven preheats.
- Place a dutch oven pan, fitted with a lid, into the oven. Preheat the oven to 450 degrees F, with the pan in the oven.
- Once the oven is preheated, carefully remove the pan from the oven and drop the shaped bread into the heated pan.
- Bake the bread covered for 30 minutes. Carefully remove the lid and bake for an additional 20 minutes.
- Remove bread from dutch oven and let cool on wire rack for 10-15 minutes before serving.
Equipment Needed
Notes
Nutrition
This post was originally published in 2017 but has been updated in 2020 with new tips.

Amanda
Yikes, mine only rose a little bit so it was super dense. I used a T salt and it had great flavor but i think next time I will weight the flour if i want to try this recipe again. I just felt like it wasn't enough yeast. I used warm water and let it sit on the counter overnight with a lid. When i mixed it up it was like a paste. The bottom also burned despite the parchment paper.
Kristen Chidsey
Hi Amanda! I am sorry you had issues. My guess is that it came from mixing the dough after it rose. It is supposed to just be turned out and quickly shaped. Mixing after rising will cause the bread to deflate and be dense.
Alex
What costiintesy the dough should be? I added only one cup of water and it's already like a porrige.
Kristen Chidsey
Hi Alex! The dough is fairly wet, but should come together to form a cohesive ball.
shirley kirby
Is there an alternative to a Dutch oven if you don't own one?
Kristen Chidsey
Unfortunately, no this bread must be baked in a dutch oven. The way the heat is conducted in a dutch oven pan and the high heat it can handle is key to its success.
Melissa
I've heard people say they use the crock pot liner and 2 layers of foil and that works! I don't have a dutch oven either and am going to try it like this.
Jan
Actually there are other ways. I used to bake it in a glass pie plate with an oven-safe glass mixing bowl covering it. I've also made it in a glass loaf pan, using another upside-down loaf pan as the "lid".
Kristen Chidsey
Thanks for sharing, Jan! Most glass pans are not safe for at this temperature, so I would proceed with caution.
Ute
I love this bread and I add a quarter cup each of sunflower and pumpkin seeds, flax and cia seeds.
Grace
Can the rising time be shortened if the dough is risen? Can it be made to test the yeast first& proceed with the rest & even baking in Dutch oven?
Thanks
Kristen Chidsey
Hi Grace! The dough needs at least 8 hours to rise. Did you by chance use instant yeast?
Rae
The final product tastes good but the dough isn’t easy to work with. The flour to water ratio is off which leaves you with a sticky, unworkable dough. At first, I measured out my flour by using the spoon method, then I weighed it just to be sure. It turned out I had way too much flour by using the spoon method so I went with the weight in grams. I wish I had just gone with my original measurement because it needed more flour. After looking at similar no knead bread recipes, this one has the most water by far. Not bad for a first attempt at no knead bread but I will definitely use more flour or less water next time.
Kristen Chidsey
Hi Rae! This dough is meant to be sticky and looser than other traditional recipes. It helps to give the bread its airy texture. Adding additional flour will likely result in dense bread.
Alex
Excellent!!! Love whole wheat bread!!!
But one note, always weigh your flour. Never used volume cup measurements.
...Flour is an ingredient where being weighed out is most accurate.
Lindsay
This recipe was fabulous! Is there a way to change this to a loaf recipe for sandwiches?
Kristen Chidsey
Hi Lindsay! I am so happy you enjoyed this Dutch Oven Bread! Unfortunately, this recipe will not work being baked in a loaf pan. I do have a recipe for Whole Wheat Honey Bread that is perfect for sandwiches.
Ari
I tried this once so far and had some issues. The dough was very sticky and hard to deal with, and then the final product burned and stuck to the bottom.
I used a scale, but as someone who hasn't baked much, I wonder the scale could have been off and there was too much flour.
To get a better idea of what could've happened, can though dough being too sticky/wet cause this burning or sticking
Kristen Chidsey
Hi Ari. I am sorry to hear you had issues. The dough should be rather sticky. As for sticking to the bottom or the pan, it may have been the quality of the pan. Moving forward, lightly grease your pan or use parchment paper that is designed to be used in high heat.
Andy
I’ve always been nervous about making bread! This is the very first loaf I’ve ever made since the recipe seemed so simple. I followed the steps and it came out amazing! I sense it will be a regular staple in our house!
Kristen Chidsey
That is wonderful! Thank you for sharing!