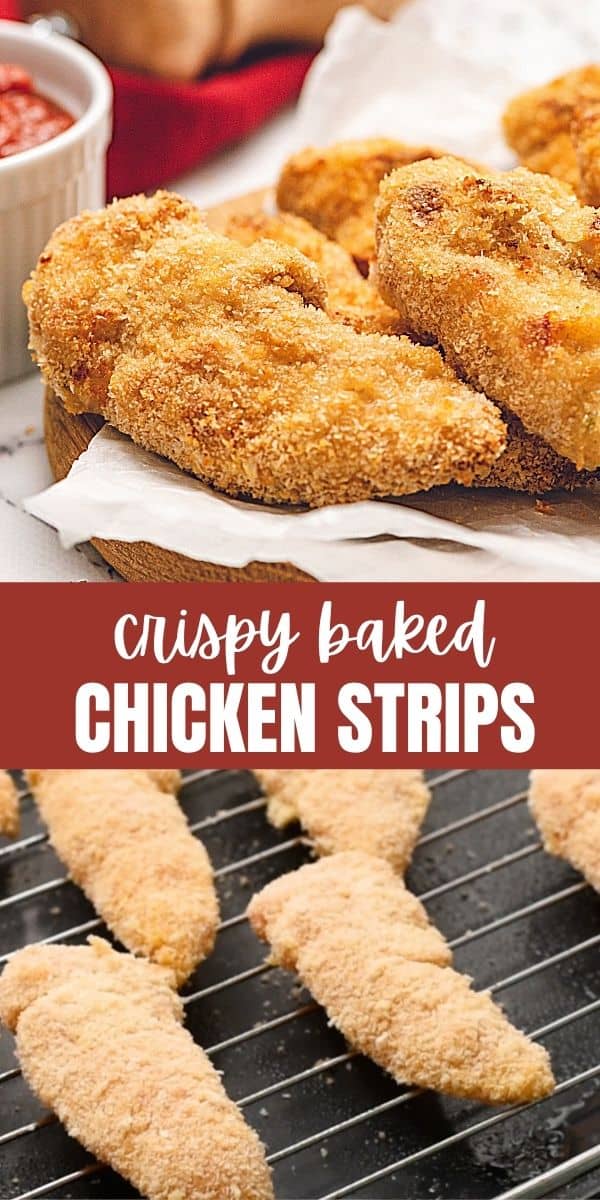
Made with a crispy breading and baked until golden, this easy recipe for Homemade Chicken Tenders produces a healthier, yet just as delicious, version of deep-fried chicken strips.
Make the ultimate kid-friendly dinner by serving these Crispy Baked Chicken Tenders with a side of Homemade Baked Fries or Air Fryer French Fries, and a side of ranch dressing or ketchup for dipping.

Every kid, and most adults, loves chicken strips. The contrast between the salty crispy exterior to juicy, tender chicken is simply irresistible.
While delicious, most chicken strips, whether ordered out or baked from frozen, are often high in fat and calories, which may make many of us think twice before consuming them on a daily basis.
Thankfully, you can easily make crispy breaded chicken tenders at home that are healthy enough to be enjoyed with abandon any night of the week!
why you will love these chicken tenders
- Perfect Results. Thanks to a few pro tips, they bake up to crispy perfection, while the chicken remains juicy and tender.
- Better for You. Baked Chicken Tenders are MUCH lower in fat and calories than fried chicken strips, yet just as delicious.
- Kid-Friendly Dinner Recipe. Crispy chicken strips--need I say more?!
- 30-Minute Recipe. This recipe for homemade chicken strips is on the table in under 30 minutes.
Ingredients Needed

- Chicken Tenders: You can purchase chicken tenderloins for this recipe, or use boneless, skinless chicken breasts that have been cut into 1-inch strips. If using tenders, be sure to clean off all fat and tendons from the chicken strips.
- Breadcrumbs: Panko breadcrumbs, not regular breadcrumbs, are best for creating the crispiest of textures. Be sure to use unseasoned panko breadcrumbs to control the seasoning yourself.
- Flour: A bit of flour will help the breading to stick evenly to the chicken. Use all-purpose, whole wheat, or even a gluten-free all-purpose flour blend.
- Eggs: The eggs will help to bind the breadcrumbs to the chicken tenders.
- Seasoning: It is crucial to season every layer of the breading on these chicken strips. Instead of using salt and pepper, I recommend using storebought or homemade seasoned salt as it adds more flavor to the chicken.
Recipe Modifications
- Air-Fryer Instructions: Use my recipe for Air Fryer Chicken Tenders.
- Make Healthier: Use whole wheat flour and whole wheat panko bread crumbs in place of all-purpose flour and regular panko breadcrumbs for a serving of whole grains.
- Gluten-Free Chicken Tenders: Use an all-purpose gluten-free 1:1 flour blend and gluten-free panko breadcrumbs in place of the all-purpose flour and breadcrumbs.
- Egg-Free Option: If you happen to have an egg allergy, dip your chicken strips into flour first, then something moist, like buttermilk or mustard, and finally panko.
Tips Crispy Chicken Tenders
The following tips will help to ensure the crispiest, best-tasting homemade chicken tenders. You will find the detailed instructions in the recipe card.
- Use Panko Bread Crumbs. Panko gives chicken strips a crunchy coating that is reminiscent of a deep-fried restaurant chicken tender. They keep the coating light and crispy. While you can use traditional bread crumbs, the results will not be the same.
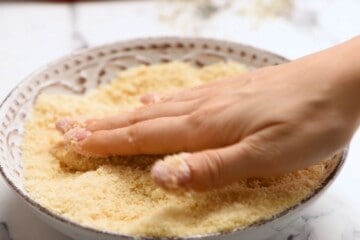
- Use a 3-step breading process. This means dipping the chicken into flour, then egg mixture, then breadcrumbs. This process allows the breadcrumbs to adhere to the chicken evenly and ensures every bit is crispy and delicious.
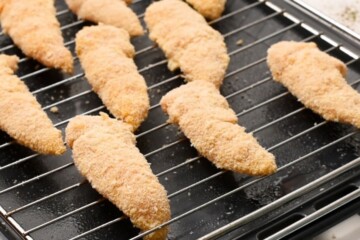
- Bake chicken strips on a baking rack. By placing the breaded chicken tenders onto a baking rack instead of directly onto a sheet pan, the air is able to circulate evenly around the chicken, allowing the breading to get crispy on all sides without flipping.

Serving Suggestions
These crispy chicken strips can be served plain, or as most kids prefer, with a dipping sauce. I love pairing these homemade chicken tenders with a side of ketchup, Homemade Ranch, BBQ Sauce, honey mustard, or Sweet Chili Sauce and a side of baked fries and a fruit salad, for a kid-friendly meal everyone will rave about.
However, don't just limit these baked chicken tenders for dipping! They are delicious when cut up and served on a salad or served whole on a homemade biscuit or bun with coleslaw for a tasty crispy chicken sandwich.
Storage & Reheating
- Refrigerate: Leftover Chicken Tenders will keep for 3 days in the refrigerator in an airtight container
- Freeze: See below for detailed instructions on freezing homemade chicken strips.
- Reheat: Place the chicken tenders on a baking sheet and bake at 400 degrees F for 5-6 minutes. This will keep the breading crispy. If you try to reheat the chicken tenders in the microwave, the breading will become soggy.
How to Freeze Homemade Chicken Tenders
Instead of stocking your freezer with pre-made chicken nuggets or chicken strips, freeze a batch of these homemade chicken tenders for a fast, wholesome meal.
- Place baked, cooled chicken strips on an oven sheet lined with wax or parchment paper and place them into the freezer until frozen solid. This will take an hour or two and helps to keep them from sticking together.
- Once frozen solid, transfer to a freezer-safe bag and store in the freezer for up to 3 months.
- To Prepare Chicken Tenders from frozen, place frozen chicken tenders onto a baking rack over a rimmed cookie sheet and bake at 400 degrees for 18-22 minutes or until warmed through.
Step-By-Step Video
If you learn better with step-by-step video instructions, check out my YouTube video for making breaded chicken tenders. I will walk you through the steps, along with sharing my tips for success.
More Kid-Friendly Meals
- Homemade Hamburger Helper
- Ham and Cheese Hot Pockets
- Baked Ravioli Lasagna
- Homemade Fish Sticks
- Instant Pot Sweet and Sour Chicken
- Pizza Meatloaf
I would love it if you tried this recipe for chicken tenders for you to leave a comment and review below.

Homemade Chicken Tenders
Ingredients
- 1 pound chicken tenderloins or boneless, skinless chicken breasts cut into 1-inch thick strips
- 1 cup all-purpose flour
- 3 large eggs
- ¼ cup water
- 2 ½ teaspoons seasoned salt divided
- 2 cups plain panko bread crumbs
- cooking spray
Instructions
- Preheat oven to 425℉. Place an oven-safe baking rack on a rimmed baking sheet. Lightly spray with non-stick spray.
- Prepare the breading station. Place the flour and 1 teaspoon of seasoned salt in one shallow dish and mix well. Whisk eggs and water together with an additional 1 teaspoon of salt in a second shallow dish. Place panko bread crumbs in a third shallow dish and mix with the remaining ½ teaspoon of seasoned salt.
- Prepare the Chicken Tenders. Trim off all fat and tendons from chicken tenders. Or if using boneless, skinless chicken breasts, cut them into 1-inch strips.
- Bread the Chicken Tenders. Dip each chicken strip into the flour, tossing to coat. Shake off excess. Dip into the egg wash, and then finally into panko breadcrumbs, using your hands to help panko coat chicken strips.

- Place the breaded chicken tenders onto the prepared baking sheet. Lightly spray the surface with cooking spray to achieve a golden exterior.
- Bake for 10-13 minutes, or until the chicken reaches an internal temperature of 165℉. There is no need to flip during the baking process if using a baking rack, as the air will circulate around the chicken, evenly crisping it up.
Equipment Needed
Notes
Nutrition
This post was originally published in August 2017 but has since been updated in January 2023.
Al
The chicken tenders were perfect! Thank you for such a fantastic recipe! I ran out of store bought ones and needed to make them for school lunches for my kids. I followed the recipe including using dry seasonings instead of just plain salt. I did 1/2 the batch in the oven and 1/2 in the air fryer. The ones in the air fryer were more golden. It may be my oven. Thanks again!
Kristen Chidsey
Hi Al! Thanks for your review and comparison between the air fryer and oven.
ALEK
I love the texture and general flavor, however the recipe seems to be missing salt, somewhere. This is such a good recipe, that I want to make it for a meeting I am helping to host, this week, where we will be serving finger foods. With that said, I need to get the salt situation worked out. I have made it twice. After the first time, I thought that I had probably accidently left out the salt that was called for. However, the second time, I was careful to make sure I did not leave any salt out. Another recipe called for salting the chicken, before breading it. Could this be the step that was left out? I don't like super salty foods. (I don't like most regular potato chips, because they have way too much salt.) My meeting is coming up very soon, so I will have to get this figured out, or find a different recipe. Thank you so much for your help!
Kristen Chidsey
Hi there! If you found the seasoning to be lacking, salt the chicken before dredging it in flour and egg mixture. You can also add additional salt to the panko layer.